You know that feeling when you click around a new platform’s UI looking for a button that should obviously exist, and it just… doesn’t? Yeah, that was me staring at Azure AI Foundry’s interface, trying to connect an MCP server to my agent.
There was no “Add Server” button. No form to input a URL. Nothing.
Turns out, to connect an external tool to your agent, you had to bypass the user interface entirely and interact directly with the raw API. Welcome to what I’m now calling “The Legacy Workflow”—a developer hazing ritual that Microsoft has mercifully fixed, but one that taught me more about agent architecture than I ever wanted to know.
If you’re building on Azure AI Foundry today, you’ve probably never experienced this pain. Good for you. But understanding what the old workflow required helps you appreciate why the new “Connections” tab is such a game-changer—and gives you insight into how Azure’s agent architecture actually works under the hood.
The Missing Button Problem
In the previous version of Azure AI Foundry, developers hit an immediate roadblock when trying to extend an agent’s capabilities. The platform supported Model Context Protocol (MCP)—the open standard that lets agents connect to external tools like ticket portals, databases, or custom APIs—but there was no visual way to configure it.
The UI was essentially read-only for these advanced features. You could see that MCP existed as a concept, but actually using it? That required going full developer mode.
You couldn’t just click around and figure it out. No drag-and-drop. No configuration wizard. Just the stark realization that you were about to spend the next several hours reading API documentation and crafting JSON payloads by hand.
Classic Microsoft: powerful capabilities buried under layers of complexity that only the most determined developers would ever find.
The Configuration Gauntlet
Because the UI couldn’t help you, updating an agent became a programmatic task rather than a configuration task. Here’s what the process actually looked like:
You couldn’t simply edit the agent’s settings through any interface. Instead, you had to send a specific API “update” command, carefully constructing a data package that defined:
- The server’s label (what you’d call it)
- The specific URL endpoint
- Any authentication requirements
One typo in your JSON payload? Start over. Malformed request body? Good luck figuring out which bracket you missed.
Without a UI to validate the connection, you were essentially flying blind. You’d send your configuration, get a 200 OK response, and then… hope. There was no green “Connected” light. No visual confirmation that your MCP server was actually registered and functional.
The only way to know if it worked was to invoke the agent and see if the tools appeared. And if they didn’t? Time to debug with nothing but cryptic error messages and your own growing frustration.
The “Vending Machine” Security Model
Here’s where things got really interesting—and by interesting, I mean the kind of interesting that makes you question your career choices at 11 PM on a Tuesday.
The most difficult concept in the legacy workflow was authentication. You couldn’t simply save your MCP server’s password or API key inside the agent configuration. The system was designed with what I started calling the “Vending Machine” security model:
The agent (the vending machine) didn’t remember your credentials from the last transaction. Every single time you wanted the agent to do work, you had to prove who you were again.

Every time you created a “Run”—which is Azure’s term for a single agent execution—you had to manually inject your credentials into the request. Not once during setup. Every. Single. Run.
If you forgot to include the security headers in the “Tool Resources” packet for even a single run, the connection would be refused immediately. No helpful error message. Just a 403 Forbidden that could mean a dozen different things.
I spent hours debugging authentication failures before I understood this model. The documentation mentioned it, but in that special Microsoft way where the critical information is buried in paragraph seven of a section you’d never think to read.
The 5-Step Dance: When a Single Question Becomes an Orchestration Exercise
In a modern chat interface, talking to an AI is a single action. Type your message, hit enter, get a response. Simple.
In the legacy Azure API workflow, a single question required orchestrating five distinct, manual steps:
First, you’d manually generate a “Thread”—a container for the conversation. This was a separate API call that returned a Thread ID you’d need for everything else.
With your Thread ID in hand, you’d make another API call to push the user’s text into that container. Just adding a message. That’s its own operation.
Now you “wake up” the agent and tell it to look at the Thread. This is where it gets fun—this is also where you had to inject those credentials we talked about. Forget them here, and nothing works.
Here’s the part that felt genuinely ancient: you couldn’t just wait for an answer. The API didn’t support streaming or webhooks for completion. Instead, you had to ask the server “Are you done yet?” repeatedly—sometimes every second—checking a status field to see if it changed from “Queued” to “In Progress” to “Completed.”
Welcome to 2025, where we’re building AI agents but polling for status like it’s 2005.
Only after the status hit “Completed” could you make a final API call to download the actual response text.
Five API calls minimum. For one question. And if anything went wrong at any step, you’d need to debug the entire chain.
The “Approval” Trap
Just when you thought you had the workflow figured out, there was one more gotcha waiting to ruin your afternoon.
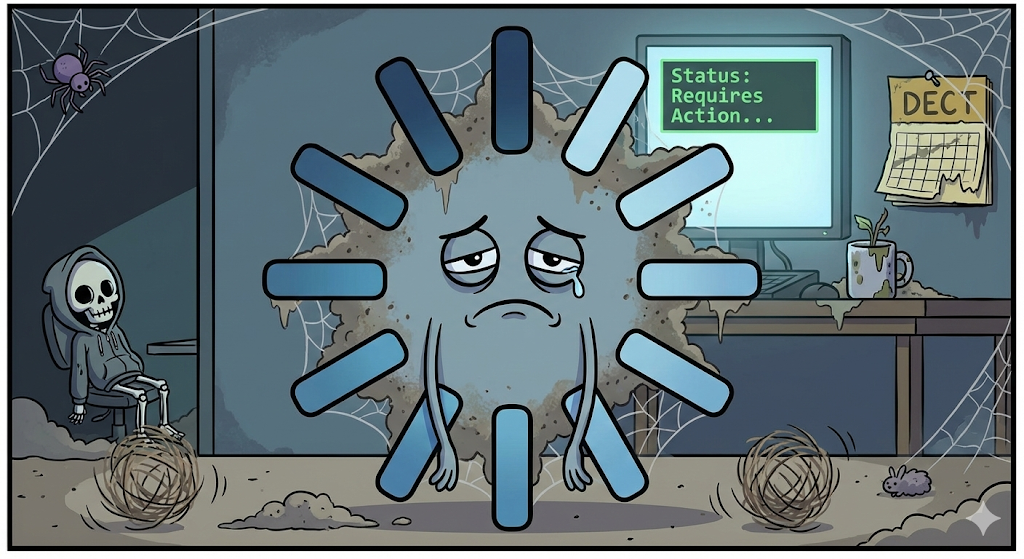
By default, when an agent tried to use an external tool, the system would pause the entire operation and switch the status to “Requires Action.”
The agent would stop and wait. Forever. If you didn’t notice the status change and respond to it, the process would simply time out. Your user would be staring at a loading spinner while the agent politely waited for approval that would never come.
To resume the process, you had to send a specific “Approval” signal via API. But here’s the kicker: because of that vending machine security model, the agent had “forgotten” your credentials during the pause. You had to re-send the authentication headers a second time just to finish the single action you’d already started.
Eventually, I learned to inject a specific command (require_approval: "never") deep into the request structure to force the agent to work automatically. But finding that option? Not obvious. Not documented clearly. Just another piece of tribal knowledge you had to discover through trial and error.
The “Messy” Tracing Experience
Debugging this process was exactly as fun as you’d expect.
“Tracing” consisted of staring at raw JSON text outputs. No visual timeline. No collapsible sections. Just walls of nested brackets containing everything the agent had done, thought, or attempted.
Finding an actual error required scrolling through hundreds of lines of metadata to locate a single last_error object buried somewhere in the response. And even when you found it, the information was often unhelpfully vague.
Errors typically appeared as generic 403 Forbidden or 404 Not Found codes. Was the error from Azure itself? The API gateway? The MCP server on the other end? Your credentials? Your configuration? All of the above? Good luck figuring it out with the information provided.
I developed a systematic debugging approach out of necessity: check credentials, check URL formatting, check JSON structure, check Thread state, check Run status, check tool registration, and finally check if Mercury is in retrograde.
The New Experience: Why This All Matters Now
Here’s why I’m documenting this history: Microsoft has fixed it.
By clicking the “Try new experience” toggle at the top of the Azure AI Foundry window, the entire workflow I just described becomes obsolete.
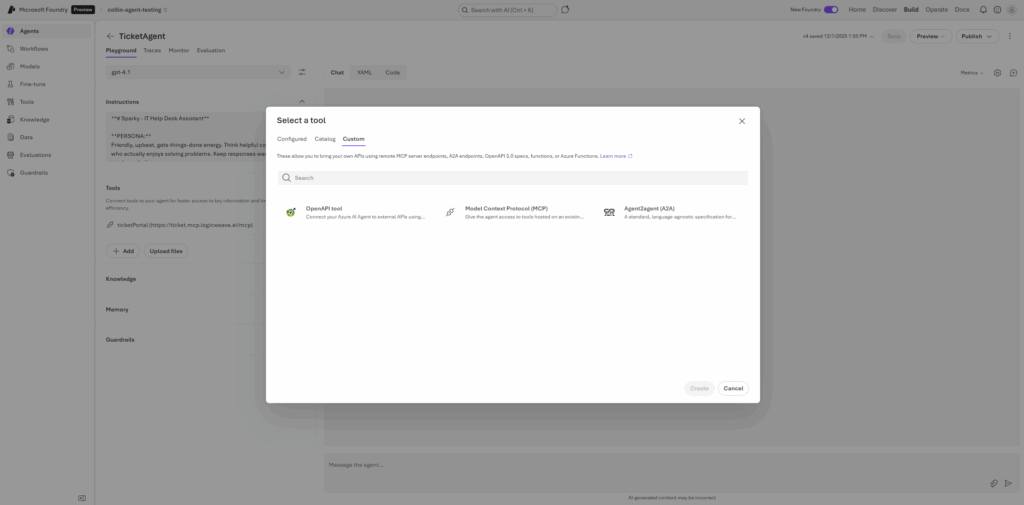
You no longer need to use the REST API to connect tools. There’s now a dedicated “Connections” tab where you can click “Add MCP Server,” type in your URL and name, and click Save. The UI handles all the patching and configuration automatically.
The first time I used it, I connected an MCP server in about 30 seconds. The same task that used to take me hours of API wrestling.
The days of parsing raw JSON text are over. The new UI features a visual Run History where you can see the conversation flow as a graphical timeline. When an agent calls a tool, it’s displayed as a distinct block. If a tool fails, it’s highlighted in red with a human-readable error message.
Debugging that used to take hours now takes minutes.
Key Takeaways for Azure AI Foundry Developers
Why I Documented This
Some people might wonder why I’d write about a legacy workflow that’s been replaced. Two reasons:
Your Turn: Have You Built with Azure AI Foundry?
If you’ve been working with Azure AI Foundry, I’m curious about your experience. Did you start with the new experience, or did you have to live through the legacy workflow like me? What’s your take on Azure’s agent platform compared to AWS AgentCore or other options?
And if you’re considering building AI agents on Azure but haven’t started yet—now is genuinely a great time. The platform has matured significantly, and the MCP integration story is finally where it should be.
Thinking about building AI agents for your business but not sure which platform fits your needs? I offer a free 30-minute strategy call where we can discuss your use case and I’ll give you an honest assessment of whether Azure, AWS, or something else makes sense for your situation.